Friday, September 28, 2012

Fruit and Vegetable Purees II

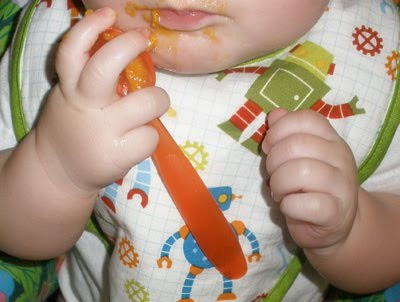
Little hands speed through his first batch of sweet potato, so I set out to make him a second batch. This time I documented the process.

I decided since I was heating up the oven I might as well make Little Hand's next food, apples, while I was at it. I chose Braeburn apples because they would handle the baking process well. Little Hands thinks they're too tart, so next time I may try Fujis.

prepare sweet potatoes

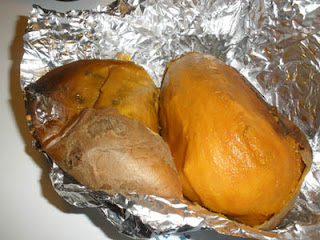
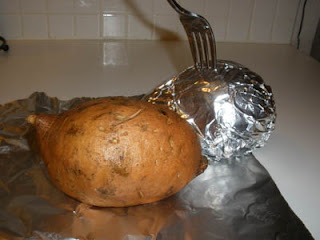
Prepare the sweet potatoes: wash, pierce, and wrap in foil. Note I made the mistake of piercing through the foil. This left me digging out four bits of foil out of every potato. I've never noticed this in my own baked potatoes (oops), but it caught my Mama eye in the finishing steps.

prepare apples

Prepare the apples: core the apples, place in a pan with 1" of water. We don't own an apple corer, so DH used a metal teaspoon to core the apples for me.

bake

Bake in a 400* F oven. The apples will be done in about 30 minutes: fragrant, fork-tender, and the skin is dark. Reserve the apple baking liquid for thinning. The sweet potatoes will be done when they're squishy; about 1 hour. (In this picture you may or may not notice that I tossed some potatoes in for DH and myself.)

kidco food mill

I initially took my Kidco Food Mill to the apples, but that was a lot of work and it was just creating a standard applesauce texture.

immersion blender

So I had DH take the immersion blender to them instead. Same texture. Much faster. Add water from the baking pan as necessary to aid the blender. Use the same liquid to thin the applesauce to the desired viscosity.

prepare for freezing

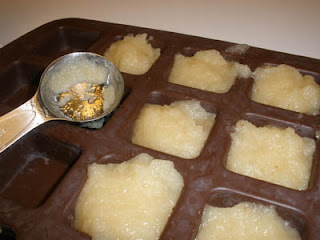
Measure out the sauce for freezing. Most people seem to use an ice cube tray. I like the perfect, 1/2-oz squares this Wilton brownie bites silicone pan makes.

baked sweet potato

Remove the peel of the sweet potatoes. Then prepare in the same fashion as the apples, adding your choice liquid for thinning. I tend to thin my baby food as little as possible in favor of controlling the viscosity after thawing.
Wednesday, September 26, 2012

Vegetable Purees

Here's my first set of baby purees: steamed carrots, steamed peas, baked sweet potato, and baked butternut squash. Silly me thought I wanted to purchase spaghetti squash, I purchased what looked right without reading its sticker, and it turned out to be I wanted butternust squash and I purchased butternut squash. That's a case of two wrongs do make a right :) Little hands likes carrots and peas, loooooves sweet potato, and neither likes nor dislikes butternut squash.

The blog was fairly silent this week because my mother-in-law was in town and we worked on making something big together. I'll get it posted once it is finished!

Monday, September 24, 2012

International Book Week

Supposedly the last week of September is International Book Week. Facebook has been abound with the instructions, "It's international book week. The rules: Grab the closest book to you, turn to page 52, post the 5th sentence as your status. Don't mention the title. Copy the rules as part of your status."

Reading may not count as creation per se, but it is part of Little Hand's daily experience. He needs down time before his morning nap, so we read. Right now we read That's Not My Truck published by Usborne and Fuzzy Bugs by David A Carter. Little Hands particularly adores the "feathery bug." We're just days away from having those feathers ripped right off the page and eatten. After we read those two books, Little Hands gnaws on a chew toy while I delve into one of my own books.

Here's a sampling of the books that are in my reading pile and the books I in varying states of reading scattered around the house. I'm pretty heavy on the reference books right now.

"Just the mention of fats and carbohydrates is enough to send many people into the depths of despair -- it's that difficult to think about these two nutrients as being a neccessity in a healthy diet." The Wholesome Baby Food Guide by Maggie Meade

"This is not the reality for most new moms!" Mommy MD Guide to Your Baby's First Year by Rallie McAllister and Jennifer Bright Reich

"It is calculated that every dollar does at least twenty-five dollar's worth of work in a single year, and I have known it to do more than that in a single week." Gospel Standards compiled by G Homer Durham

"Raskolnikov went on puzzling, 'but how can he help me now?'" Crime and Punishment by Fyodor Dostoevsky translated by Richard Pevear and Larissa Volokhonsky

"But to catch all those dirty diapers, you'll need a diaper pail designed to whisk away and store the evidence (and odor)." What to Expect the First Year by Heidi Murkoff, Arlene Eisenberg, and Sandee Hathaway

"Share." Baby Sign Language Basics by Monta Z Briant

"This is the time when a unique sign, significant to him and understood by you, may well prove to be more effective and much easier to learn because he will be able to relate to its significance." Sigh Language for Babies and Toddlers by Christopher Brown and John Clements

"Add cooked spahgetti to sauce." Once-a-Month Cooking by Mimi Wilson and Mary Beth Lagerborg

"But there were two difficulties in the way of marriage into the County families." Gone with the Wind by Margaret Mitchell

"Each variation has its own advantages: a block may be easily removed when the chocolate is tempered, while chips cool the chocolate more rapidly." Chocolate & Confections by Peter P Greweling

Friday, September 21, 2012

Dribble Bibs

Little Hands needed dribble bibs, and I wasn't happy with the low absorbency of the commercially available bibs. This pattern was a very simple trace-and-create job. Fussing with the bias tape all around those corners, however, was not simple. I made three bibs for Little Hands and one for another baby, but ended my plans to future bibs. Now that I have a few geeky bibs for my little 'un, I'd rather devote my time towards other projects than this one.

Supply List

Method for Sewists

  1. Trace a bib on tissue paper. I tweaked the design to be a bit larger.
  2. Cut out two layers of pretty fabric; make certain they're opposites! And one layer of absorbent liner. My terry cloth really makes this to be extremely absorbent, but it also makes for a bulkier bib. Little Hands has not complained about the bulk, and I like the extra absorbency.
  3. Prepare bias tape. I used only a 1/4 yard of fabric with 1.5" strips and had plenty for two bibs. Of course, your yardage will vary depending on the circumference of the bib pattern you use.
  4. Cut hook tape and loop fabric to size. Stitch hook to the neck loop end of one piece of fabric. Stitch loop to the bib body of the other piece of fabric. This step is really why I even bother writing out these directions. On my first attempt I forgot to attach the side of the hook and loop that isn't attached by the bias tape.
  5. Layer fabrics and attach bias tape.

Friday, September 14, 2012

A Pan Organizer

before

This (recreated) utter mess is what my pans cabinet looked like before this project. The cabinet is in a great location, but I own too many pans for the small space. Unfortunately, all my other cabinets were too far away or even smaller, and the kitchen design isn't conducive to hanging the pans from the ceiling or a wall.

The solution I liked best was the Maple Racks from the Container Store. Those racks what they use to organize their in-store products. I already utilize the similar 4-Sort Dividers to organize my baking pans.

Sadly, those maple sorters aren't the correct dimensions for my cabinets, pan heights, and quantity of pans.

Happily, the construction is pretty obvious: wood + holes + dowels.

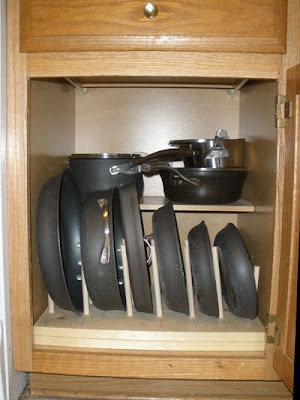
This is the solution which DH and I designed. It isn't as elegant as the store-bought version, but it does the job better. I measured the cabinet. DH went to Home Depot, selected the wood, and had them cut it to size. (We lack the equipment to cut it ourselves.) I then measured the height from counter-to-handle-arch of each pan. Using those measurements, I marked where I wanted each dowel to be located; you can still see those penciled notes on the wood itself. DH drilled holes through the first board, cut the dowels to height, stuck 'em in, et voila.

Our original intent was to use nails and glue to affix the two boards and all the dowels into a solid form. Then I might have painted it.

The reality is that this project was started when I was 9 months pregnant and couldn't stand the pan disarray anymore. The supplies were purchased then, but they sat in the garage until Little Hands was 2 months old. At that time, I was frustrated enough with the project to move it forward, but I was too exhausted to add in the finishing steps. I'll admit I now don't have much intent on prettying up the rack because it's functional and it's hidden in a cabinet anyway.

after

Ta-daaaa. This is how my cabinet looks now. It's wonderful to not have to get on the floor and dig to find a particular pan. It's also wonderful to not have to figure out how to shove a pan into the cabinet without it scratching another or falling out.

Want to implement this idea in your own kitchen? Don't forget to pin it!

Wednesday, September 12, 2012

Butterscotch Sauce

This rich, butterscotch sauce is sweet and buttery. Once you try this easy recipe you won't go back to purchasing butterscotch topping in a jar. Serve on brownies or with ice cream or with both. DH and I like to put the sauce directly on a brownie in a simple-syrup fashion.

Butterscotch Sauce Recipe by David Lebovitz

Makes: 1 cup sauce

Prep Time: negligible

Cook Time: 10 minutes

Ingredients

  • 4 tablespoons (55 g) salted butter
  • 1 cup (180 g) packed light brown sugar
  • 1/4 cup (60 ml), plus 6 tablespoons (90 ml) heavy cream
  • 1/2 teaspoon pure vanilla extract

Directions

  1. In a wide saucepan or skillet over medium heat, melt the butter with the brown sugar and the 1/4 cup of heavy cream, stirring until smooth.
  2. Increase the heat to medium-high. When the mixture starts bubbling, stop stirring. Let the mixture cook at a bubbling simmer for three minutes. Tweak the heat every now and then to keep the bubbling consistent.
  3. Remove from heat and stir in the remaining 6 tablespoons of cream. Let cool, then stir in the vanilla extract.
  4. Serve warm.
  5. Store in sealed container in the fridge for up to two weeks. Reheat the sauce over low heat.
Like this recipe? Don't forget to pin it!

Monday, September 10, 2012

A Stained Glass Art Panel

This little beauty of aqua, red, and blue was made back in July in an "Art Strip Workshop" at Blue Moon Glassworks in Austin, Texas. It's a quick, three hour class which doesn't even take the time to cement this piece. I'm assured it's such a small thing at only 3-inches wide and about 2-feet tall that it doesn't need the structural rigidity cementing would give it. Well, that and cementing takes a lot mess and time.

I'm pretty pleased with the piece. When I walked into the class I hadn't the slightest notion what the panel I would walk out with would look like. The student seated directly across from me was a lefty, and the way that the workstations were designed meant that our work spaces occupied the exact same square footage. She started building first, so that gave me a good 40 minutes to play with design and colors. (Albeit it also meant that I was rushed through my own build. I'd already taken a class working with lead before, so it wasn't detrimental.)

Now I just need to aquire a hook and chain so that I can hang it up!

Sunday, September 9, 2012

Caraway Pot Roast

This roast beef dish is savory, tangy, and - most importantly - easy to create. The apple is a surprising touch and its tartness compliments the roast. You can cook this immediately or you can prepared it in advance and freeze it until you need a day off from cooking. I took a knife to my roast and divided it into two meals.

Caraway Pot Roast

adapted from Once-a-Month-Cooking by Mary Beth Lagerborg and Mimi Wilson

serves 4

Prep Time: 10 to 15 minutes

Cook Time: 6 to 12 hours

To prepare and freeze:

  • 1 large onion, finely diced
  • 1 tsp crushed garlic
  • 2 1/2 pound roast beef, fat trimmed
  • 15-oz Libby's Bavarian Style Kraut, drained
  • 1/2 tsp salt
  • 1/4 tsp pepper

To finish and serve:

  • 1 cup of water
  • 2 granny smith apples, grated
  • 16-oz wide egg noodles

Directions

  1. Place all ingredients except water, apples, and noodles in bag and seal well. Freeze.
  2. Thaw and put into Crock-Pot. Add water, cover, and turn on low for 6 to 8 hours. (12 hours if not thawed.)
  3. Shred the meat in the juice. Grate apples and put on top meat. Serve on cooked noodles.
  4. Are you interested in this recipe? Don't forget to pin it!

Supply Purchasing Philosophy

When purchasing supplies I have a basic hierarchy of preferences on where to obtain goods. First, the local stores that make Austin the unique place it is. Second, regional and national chains which have a presence in Austin. Third, the ethereal Internet from whence nearly anything can be obtained.

Local Shops

I love local shops. I consider them to have a more thoughtful selection than their big box counterparts, and I find I like a higher percentage of their stock compared to a chain store. Their prices are likewise higher, but the quality also tends to be higher as well. I like to keep my money local: support local people who in turn can then spend the money locally. It's also nice to be able to chat with people who love their stores and the art or craft their store supplies. The downside is that I have yet to ever leave a local store without a plan to visit a larger store to find the reminder of the supplies I need.

Regional and National Chains

Entities with the ability to purchase in large quantities and afford huge retail spaces have the advantage of being able to keep a large variety and quantity of stock. Their offers of coupons and sales are enticing. It's also nice to go to a store and be certain they'll likely have the tool I need. The trade off for a large stock at a low price is a sacrifice of knowledgeable employees and quality of goods.

The Internet

I believe the availability of online shopping is revitalizing the world of makers. When I can't find a specialty item locally, there is often someone on the internet who can provide exactly what I want. It's also incredible that with 2-day shipping I often what I need can often arrive on my doorstep before I have time or energy to go shopping with Little Hands. The great disadvantage is not being able to see and handle the product in person prior to purchase.

Thursday, September 6, 2012

Hello, World

I open a new blog. It seems appropriate as I have a different life from my last blog. Now, I'm a 30-something at-home mother in Texas. Then, I was a 20-something student in Utah. The struggles and challenges now are very different. The things I want to talk about are different: good bye thesis, hello poopy diapers. Don't worry, I don't actually want to talk about poopy diapers. (Though sometimes it seems the only notable part of my day is how many I changed and how they looked.)

A challenge of my new position in life is a sense of accomplishment. Every day is filled with a seemingly endless repetition of sameness, and at the end of the day it often feels I've done nothing save for keep my child alive for one more day.

So that is what my new blog shall be. A celebration of the things I create and complete. Topics will likely include home organization, cooking, and sewing. Much of my inspiration will derive from things I've pinned.